Oven Baked BBQ Baby Back Ribs

Oven Baked BBQ Baby Back Ribs are mouth-watering, tangy, juicy, tender and perfectly portioned!


Oven Baked BBQ Baby Back Ribs are mouth-watering, tangy, juicy, tender and perfectly portioned!

Someday I'll own a smoker.  My Step-dad has one.  It's not much to look at, second hand in fact.  But, let me tell you, once I tasted the smokey rustic hunks of meat that come out of that rickety old thing, I was in love.

I swear it's not really a smoker, but in fact a doorway to barbecue heaven.

I would smoke meats all day long if I had one; ribs, chicken breasts, sausages, beef brisket, ham.  I'd be a smoking fool.  But alas (insert dramatic sigh here), I do not own one.  So, until I can one day say that I do, I'll be baking my ribs in the oven and finishing them off for a few minutes on the grill to get the job done.

Oven baking your ribs won't leave you with the authentic smoke taste of a smoker, but I assure you, this method will yield some of the most mouth-watering, tangy, juicy, tender, perfectly portioned ribs you'll ever taste.  If you have time to get all the prep done the day before, all the better.  You can get the foil packs ready and store them in the fridge overnight so the meat can marinate in the flavorful barbecue sauce.  Makes for a no fuss and sure to impress meal the next day. And just think, you can enjoy the taste of a summer BBQ all year long if you bake 'em in the oven.  Sounds good to me.

Update: I am now the proud owner of a smoker bought at a yard sale for $10.  That's what I'm talkin' about.  

Oven Baked BBQ Baby Back Ribs


Ingredients
  • 1 rack of baby back pork ribs, about 4 lbs  (Spareribs would work just as well, it's really just a matter of preference.)
  • barbecue sauce for coating (My recipe below, or use your favorite bottled sauce.)
    • 1 cup ketchup
    • 1 cup vinegar
    • ½ cup dark corn syrup (I've substituted light in a pinch and it worked just fine.)
    • 2 tsp sugar
    • ½ tsp salt
    • ¼ tsp garlic powder
    • ¼ tsp onion powder
    • ¼ tsp hot sauce

Instructions
  1. Combine all of the ingredients for the barbecue sauce in a medium saucepan and bring to a boil over high heat.
  2. Reduce heat to medium and simmer uncovered for 30-45 minutes until sauce has thickened to your desired consistency.  Remove from heat.
  3. Preheat oven to 300°.
  4. Cut the rack of ribs into 3-4 sections. Each piece should easily fit on a plate and be a good serving size for one person.
  5. Tear off one piece of aluminum foil for each section of ribs.  The aluminum foil pieces should be at least 6-8 inches longer than the length of the ribs.
  6. Coat both sides of the ribs with barbecue sauce and place lengthwise in the center of the foil.  Each section of ribs should be in its own foil packet.  Wrap tightly and place seam side up on a cookie sheet.
  7. Bake in the oven for 2-2½ hours.  You know that they are done when the meat has shrunk from the cut end of the bones about a ½ inch.
  8. Prepare the barbecue grill.  (If you don't have a barbecue, the grilling step can be substituted with a few minutes under the broiler.)
  9. Remove the ribs from the foil and re-coat with more barbecue sauce.  Grill for 2-4 minutes on each side, or just until you start to see small charred black spots.  Be careful not to burn them!  If the flames are touching the meat, they'll burn in a heartbeat!
  10. Serve with extra sauce on the side for dipping.

 Notes
  • Source:  Taken from the book "Top Secret Restaurant Recipes".

Baked Phyllo Spring Rolls

Baked Phyllo Spring Rolls use sheets of light phyllo dough to roll up lots of fresh veggies and meat to make crisp, delicious spring rolls.

Baked Phyllo Spring Rolls

Okay, so I know I cook a lot of rich food.  My tastebuds are in love with pretty much all of the no-no's.

You know what I'm talking about.

Cheesy, creamy, lusciously delicious foods.  Pizza, baked macaroni and cheese, philly cheesesteak sandwiches, french fries.  Ugh, I love them all.


But after arguing with my scale for the past couple of weeks (I swear it lies!) and randomly deciding to watch my dvd of the first season of Sex and the City (can I please just have Carrie Bradshaw's body?), I'm feeling like I need to up the healthy dinners a bit.


Which brings me to this recipe.  I found it in Rachel Ray's magazine and fell in love with it.  The phyllo dough is light and bakes to crisp deliciousness and is packed with fresh veggies galore.  And the best part?  One spring roll is only 85 calories. (Take that, scale!)  I don't think I'll be giving up my baked macaroni and cheese any time soon, but I can at least attempt to balance it out a few nights a week.   With recipes like this, it won't be hard.

Kari's Simple Stuffed Peppers

This post contains affiliate links. Please see our full Disclosure for more information.

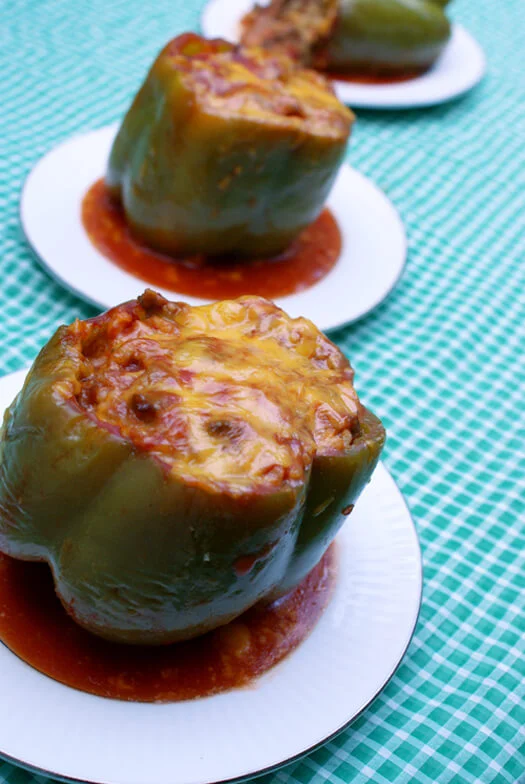
Kari's Simple Stuffed Peppers is the best stuffed peppers recipe out there!  These oven baked stuffed peppers are a family favorite made with ground beef, rice, and lots of cheese.

Kari's Simple Stuffed Peppers is the best stuffed peppers recipe out there!  These oven stuffed peppers are a family favorite made with ground beef, rice, and lots of cheese. #stuffedpeppers #dinner #groundbeef

Apparently, my mother and I have a difference of opinions when it comes to the "right way" to prepare stuffed peppers.  I never really thought there was a right way or wrong way to make them, but to my mom there surely is!

Let me explain.  I got this super simple recipe from my sister Kari, hence the name of the recipe.  After hearing her family mention on several occasions that this is one of their absolute favorite dishes, I decided I needed to figure out just what went into such a stellar dish and how exactly she prepared them.  So, I got the scoop, I cooked them, and thought they were delicious!  My sister's recipe is just your basic, no-frills, easy to prepare stuffed pepper recipe that anyone can make.

Well, when I called my mom the other day and was telling her I was going to post Kari's method here on the blog, I was informed that her way is not our family's way of doing it.  You see, Kari pre-cooks her beef and mixes it with cheddar cheese prior to stuffing the pepper.  According to my mom, the way she and my grandmother have always made stuffed peppers it is to stuff the peppers without cooking the meat first.  After you bake them using my mom's method, the inside is kind of like a big meatball.

And mom uses no cheese.  Really mom?  No cheese?  As a self-proclaimed cheese-aholic, I do not approve!

Now, I'm not one to go against the way it's supposed to be done, but I sure did like the way they turned out when I followed Kari's recipe, so this is the way I'm gonna keep making them.  Sorry, momma!  What way does your family make stuffed peppers?  Let me know in the comments below!

Here are a few more of my family's favorite dinner recipes from the archives:


Yield: 6 servings

Kari's Simple Stuffed Peppers


Kari's Simple Stuffed Peppers is the best stuffed peppers recipe out there!  These oven stuffed peppers are a family favorite made with ground beef, rice, and lots of cheese.
prep time: cook time: total time: 1 HOUR

INGREDIENTS


6 green peppers
1 lb ground beef
1/2 cup chopped onion
salt and pepper to taste
1 (14.5 oz) can petite diced tomatoes, undrained
1 tsp Worcestershire sauce
1/2 cup uncooked rice
3/4 cup water
1 1/2 cups cheddar cheese, shredded, split
2 (10.75 oz) cans of condensed tomato soup
water

INSTRUCTIONS


1. Preheat your oven to 350 degrees F.

2. Cut the tops off of the peppers and remove the seeds and white membrane.  In a large pot of salted water, boil the peppers for 5 minutes.  Drain and set aside.

3. In a large frying pan, cook the beef and onions until the beef is no longer pink, about 5 minutes.  Remove the grease and season with salt and pepper.

4. Add the tomatoes, rice, water and Worcestershire sauce.  Cover and simmer for 25 minutes, or until the rice is tender.  Remove from the heat and stir in 1 cup of the cheese.

5. Place peppers in a glass baking dish and fill with the meat mixture. (I've found that my high sided Corningware works best to keep the peppers from falling over.)

6. In a medium bowl, mix the soup with just enough water to make it a gravy consistency.  Pour over the peppers.  Top with remaining 1/2 cup of cheese. Cover and bake for 25-35 minutes.


Nutrition data should not be considered a guarantee. Please see our full Nutrition Data Disclosure.

Chicken Divan Over Egg Noodles


I grew up with the best godparents a girl could ask for.  My Aunt Laura and Uncle Bob (who are technically my great-aunt and great-uncle) never let a holiday or special occasion go by without some kind of simple reminder of how much they loved me and how happy they were to be my godmother and godfather.  I have so many memories of when we visited them or they came to visit us; homemade pretzels and Easter egg cupcakes, the infamous huge brown paper bag of bagels, going swimming at the community pool and playing on the shuffleboard courts. I fondly recall the time my Aunt let me eat just the skin off of the leftover roasted chicken after dinner and then ice cream sundaes for breakfast the next day.  

It's funny though, how as a kid you can go through the years knowing how much you love someone, knowing that they are special and kind-hearted people, yet not really know all that much about the life they lived and the experiences that helped shape them into the people that seem so familiar. 

My Uncle decided to do some traveling after my Aunt passed away when he came to town and my husband and I had him over for dinner.  It was then, over this simple comforting dish, that I learned some of the stories of my Uncle's life.  We sat around the table and ate and talked and I learned things that I had never known.  I always liked this chicken divan recipe, but it never really meant all that much until I served it that night.  

Sometimes a small informal meal accompanied by intimate moments of reflection with loved ones can leave a bigger impact on you than the lavish thirty-guest party you spent three months planning.  So now, when I cook this meal I always smile and think of my Aunt and Uncle.  I think about the countless memories we've shared, the memories my Uncle shared with me that night and the stories still left untold.  


Ingredients
  • 1 large head of broccoli, cut into florets
  • ¼ cup butter
  • ¼ cup flour
  • 3 tbsp sherry
  • 2 cups chicken broth
  • ½ cup heavy cream
  • ½ tsp salt
  • a pinch of ground black pepper
  • 2 boneless skinless chicken breasts, cut into ¾ inch cubes
  • 2 tbsp olive oil
  • ½ cup parmesan cheese, grated, split
  • 1 pkg extra wide egg noodles, cooked and drained


Instructions
  1. Preheat oven to 350°.
  2. In a large pot of water, boil broccoli for for 3-4 minutes or until just tender.  Place cooked broccoli into a large glass baking dish.  (I use an 8½ x 11.)
  3. In a large frying pan, saute chicken in olive oil until cooked through an no longer pink.  Place in the glass dish over the broccoli.
  4. Melt butter in a medium saucepan over medium heat.  Whisk in flour and cook for about 3 minutes, stirring constantly.  Whisk in sherry, chicken broth and heavy cream until smooth.  Bring to a boil then reduce heat to medium low and simmer for 5 minutes, stirring occasionally.  Stir in salt, pepper and ¼ cup of the parmesan cheese.
  5. Pour the sauce over the chicken and broccoli and top with the remaining ¼ cup of cheese.
  6. Bake uncovered for 20 minutes.
  7. Meanwhile, cook the egg noodles according to the package directions.
  8. Broil chicken divan for an additional few minutes until top is golden brown and serve over egg noodles.


     Notes
    • Source:  allrecipes.com

        Homemade Calzones

        Homemade Calzones - This recipe makes two large calzones or four smaller ones that are filled with mozzarella, ricotta and all of your favorite pizza toppings.

        Homemade Calzones

        A few years back, a friend came to me in need of some advice.  You see, there was a special occasion quickly approaching.  It was an event that doesn't come around too often.  One that requires extra special consideration and preparation.  She was cooking dinner for her boyfriend for the very first time.  With no menu planned and no ideas in sight, she turned to me to help her come up with a man-pleasing, sure to impress and low stress recipe that wouldn't leave her beau hitting the drive-thru on the way home.